Days of Chalk and Chocolate - seasons Days of Chalk and Chocolate: seasons - All Post
Showing posts with label seasons. Show all posts

Last Minute Fourth of July Marshmallow Pops

Share It:
These patriotic marshmallow pops make the perfect last minute 4th of July treat!  They were super easy to whip up. In fact, it is a great dessert to make with kids, Molly and Ellie did these by themselves!  Aren't they cute?  Even if you can't find the star shaped marshmallows, the red, white, and blue, sugars would make any marshmallow perfect for a holiday get together!


You'll need lollipop sticks, white melting chocolates (I used the wafers you find in craft stores), and  red and blue sprinkles or sugars.

1. Melt the candy wafers in the microwave.
2. Dip the end of the lollipop stick into the chocolate and then into the marshmallow. The melted candy will help the marshmallow stick to the stick.
3. Dip 3/4 of the marshmallow into the melted white candy/chocolate.
4. Sprinkle with the red and blue sugars or sprinkles.


So cute, so easy, and very kid friendly.

Happy 4th of July, my dear friends!  Let freedom ring!

Cheers!
Jenny

Patriotic Scrap Bunting

Share It:

Memorial Day weekend is almost here. And while it is a solemn occasion, it is also a time to honor our country and its heroes.  

Have you been getting into the spirit of the holiday with patriotic crafts?  I did! I created a quick and easy patriotic bunting but I used red, white, and blue in a more subtle way. This way, it doesn't scream "FLAG!" and I can use it throughout the summer!

patriotic bunting 
I selected my fabrics and created a triangle template from cardboard. Then I traced each piece and cut each pennant with pinking shears. 
I cut a long strip of fabric about an inch wide. I folded 1/2 " in on each side and pressed it down.

patriotic bunting

Then I folded it longways in the middle and pressed it again.
patriotic bunting

I pinned each triangle inside the fold of the fabric strip and then ran it straight through my sewing machine. It was that easy!
patriotic bunting

I love that it is red, white, and blue...festive!
patriotic bunting


patriotic bunting

I purchased these fabrics for this bunting project but wouldn't this be a great way to get rid of some scrap fabric?

patriotic bunting 8

If you enjoyed this post , you can also follow me these ways:

Jenny

Spring Place Mats: Beginner Sewing Project

Share It:

Spring is a time to refresh your space, don't you think?  I had this pretty chocolate brown and pink fabric that begged to be used. So I whipped up some easy place mats to give my spring table a little pizzazz!  This is a great beginner sewing project too.

You will need two pieces of fabric (I used the same for both sides but you could do two coordinating fabrics) approximately 15" x 21" .  The finished place mat will be approximately 14" x 20".  You will also need one piece of iron-on light weight interfacing in the same dimensions.

Iron on the interfacing according to the package directions to the wrong side of one piece of fabric.


Layer your second piece of fabric on top so right sides are facing.  Your interfacing should be face down.  Pin in place.


Sew around the edge of the pieces leaving an opening so you can flip it right side out. I used a   1/2"seam allowance.  Before flipping trim excess fabric and you can clip your corners if you wish. That will give you cleaner corners once flipped.
After flipping it right side out, tuck in the opening's edges and iron everything nice and flat. Then top stitch compleaely around the entire place mat. I used one of my machine's decorative stitches!  Iron your top stitching and that's it!  You are done and you can move on to the next one. You can make 4 in one afternoon, I promise.


And there are only two more days to enter the Cricut Explore Air giveaway!  Hurry!


Cheers!
Jenny

Valentine's Day Bag Toppers

Share It:


     I know some people are not so in love with Valentine's Day but I admit that I'm NOT one of them. I adore the holiday!  I don't really need a romantic Valentine's Day but I do enjoy a festive one with cute decorations, valentines, and food. So I whipped up some Valentine's Day  printable bag toppers for the neighborhood kids!

holidays-animals-valentine-kids


There are 4 toppers on each printed page.


Here's a little throwback to some 4 more Valentine's Day printables too.
hearts-love-holidays-valentine

Have a great weekend!
Jenny

Dining Room Update & Gift Ideas

Share It:
This post is sponsored by Cost Plus World Market. All opinions are mine alone. #worldmarketnj

A few weeks ago I was excited to tell you all about the Grand Opening of the new Cost Plus World Market store in Shrewsbury, NJ.   You can read about it here if you missed it. Last week, I was lucky enough to be invited to browse in the new World Market store and add some World Market flair to my home!

Was it fun?  Oh yes!  I can't wait to go back, in fact. There is so much to look at and it was hard not to buy everything!  But I'll show you a few of the things I did get!

You may remember my white china cabinet from posts way back when. It is a solid, happy little piece but it isn't working for me anymore. I have accumulated a lot of pretty serving pieces, etc and I am running out of space. 

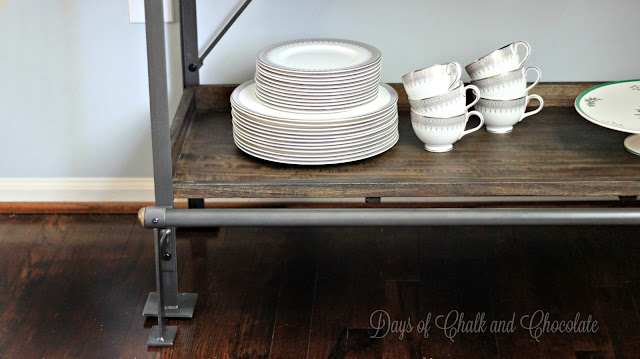
I fell in love with the Emerson bookcase online and knew it was exactly what I was looking for when I went to World Market. She is huge with deep shelves and I knew she would work perfectly to hold my pretty things. 


The dark wood shelves compliment my wedding china perfectly and I'm so happy to have the china out where I can see it instead of stowed behind doors!


piper-platinum-emerson-bookshelf

 I preferred this bookcase over others because of its interesting details. It has these cool handles at the top and a step rail at the bottom. Very different and industrial which is what I needed in my traditional dining room! 


world-market-emerson-bookcase

details-handles-rustic-industrial

world-market-emerson

To say I adore it may be an understatement!

I also picked up a few other things!  This sweet, little vintage sign looks perfect in my bay window in my kitchen.  This window ledge is my baking area and I think this sign adds just the right touch.


kitchen-sign-vintage-pies


baking-center-window-sign


The food aisles are so fun to browse through and I scooped up some holiday treats, including some chocolate coins and  Christmas chocolates!  They look so pretty nestled in my milk glass candy bowl.


chocolate-christmas-stocking-stuffers

I also picked up a few other gifts while I was there.  My mom and aunt will love these sweet smelling French milled soaps and hand creams.


It was so fun to add some new pieces to my home for our holiday guests and to find new and different gifts to give!


Have you spruced up your home for the holidays?

What The Flock!

Share It:
"Oooh, I love all the flocked trees on the Internet!" I said.
"Oooh, there are so many DIY versions!" I said.
"Oooh, I know! I'll DIY flocking! What could go wrong?" I said.


I used two methods. One used shredded Ivory soap bars mixed with liquid starch and hot water. This turned into a slippery, gloopy mess that laid on the branches like bird poop. I also tried using powdered laundry detergent, also mixed with starch and hot water. This went on almost clear but then dried to a white, snowy effect. We all decided we liked this look the best.

But it was seriously the biggest PITA DIY I have done in a while. I will never do this again. It was SO messy!  And the smell! My whole house reeked of soap for days. In fact, I bet I have brain damage. It was that bad. Now I'm brain damaged and I can't even say it was worth the fewer IQ points.

We spend a chunk on our trees because we buy them from a family outfit and the trees are gorgeous.  I decided that this flocking made my beautiful, natural tree look fake. Not that there is anything wrong with a fake tree but when you have a real tree you kind of want that recognized. I mean I'm laying out $70 so we can all join hands and sing about its branches or something.  Covering it up with laundry soap no longer makes sense to me, despite my damaged brain.  Why did that ever make sense now that I read that sentence?

And here is the worst part.


I have actually created stuff I need to vacuum. I can't blame it on those darn kids. I can't blame it on the dog. It is me. All me!  I created something that literally needs to be vacuumed daily. And God forbid anyone actually touches the tree!  I will leave a trail of fire behind me as I run to prevent anyone from even breathing on the stupid tree!  It will moult and I am not real keen on vacuuming in the first place, let alone in the second and third place.  And if you even so much as sneeze near it, you are out. done. goodbye. Leave your dessert and then get out.

So, in case you haven't caught what I'm laying down here I'll spell it out.  Flocking is flocked up. I will either buy real flocking powder (which I will never do because it is too darn expensive) or buy a fake flocked tree (which I also don't see myself doing because I like a real tree. Not that there is anything wrong with a fake tree.).


Even Pixie is fed up.

holiday christmas decorations
"This is for the flocking birds."

Now here is a DIY that was successful!  Glitter ornaments!  We'll talk more about these later.


Cheers!
Jenny

Christmas Link Party: Home Tours (Week 2)

Share It:
Guys, last week's link ups were fabulous!  I loved all your Christmas tree and ornament ideas!  Here are some of my favorites!

 Major Hoff Takes A Wife


 My Sweet Things


 Twelve on Main


And now it is onto this week's link party!  HOME TOURS!  Everyone's favorite, I think!  Here are the rules and your hosts!

It's Christmas season! Woo Hoo! And what better way to kick off this festive time but with a Christmas Link Up! I am partnering with some of my favorite bloggers to provide you  with 4 weeks of holiday ideas!

Week 1: Christmas trees
Week 2: Home Tour
Week 3: Gifts
Week 4: Holiday Food and Recipes

Your hosts:
I hope you'll visit a few of these blogs too!

Rules of the link up: 
1. Please link to a specific post on your blog, not your blog’s home page.You may link up to 3 posts per blog.

 2. Please leave a comment for your host, remember it's a party!

3. Please be sure to visit a couple of other blogs and leave comments.

 4. No Etsy stores, giveaways or other link parties allowed.

5. Please link with a text link or party button to your host.

6. By submitting a link, you’re giving us permission and granting us the right to feature your project and photos on this blog, website and on social media. We will always give proper credit and a link back to your post.

 7. Each week, a few of our favorites will be featured on our blogs. Features will also be pinned to our Christmas Link Up Pinterest Board for even more exposure! If you were featured, be sure to grab a button!

I can't wait to see what  you link up!!


DIY Letter to Santa Tree Ornament

Share It:
Ok, first things first. One of Amazon's daily deals today is a Silhouette Portrait for half price!!  Now back to our show.....


All couples argue, right?  Money, kids, in-laws...everyone has an issue that never seems to get resolved. Our issue?  Glitter. And there is never a more tense time in our household than during the Christmas holiday season when I am glitterfying everything that isn't walking and Jim is going to work look like a Bratz doll.


See, I love glitter. The more the better. Yes it gets around faster than a stomach flu in a kindergarten class but I don't mind. I love seeing everything sparkle, especially during Christmas. Jim, on the other hand, never learned to appreciate it. He really HATES it. And this is how I know he truly loves me because he puts up with it and he knows he'll never win this fight. Glitter will go on.

These cute little letters to Santa ornaments were so easy to make!

1. Tear white paper on either side to the width you'd like your ornament to be. I used two sizes, one about 3 inches and one about 6. You can tear your length to about 6 inches too.

2. Roll up your paper into a tube. I found rolling it around a pencil made it easier. Tie with a ribbon to hold the rolled paper together.

3. Dip easy end into glue and then sprinkle with super fine glitter. My color is platinum and it is a silver color with a tinge of gold.


4. Let dry.

5. Cut a little gift tag out of card stock. Using a metallic marker, write "To Santa" the tag and glue to the ribbon end.


6. Glue a sprig of evergreen (real or fake) to the paper roll under the ribbon if you wish.

So cute, right?  Kids could do these easily too.


And while Jim may not love glitter, he's stuck with it just like he's stuck with me! And I'm way tougher to get rid of than a little glitter.

Oh and don't forget that homemade pompoms make darling ornaments too if you need to plump up your tree!


Stay sparkly!
Jenny

Christmas Link Party!

Share It:


It's Christmas season! Woo Hoo! And what better way to kick off this festive time but with a Christmas Link Up! I am partnering with some of my favorite bloggers to provide you  with 4 weeks of holiday ideas!

Week 1: Christmas trees
Week 2: Home Tour
Week 3: Gifts
Week 4: Holiday Food and Recipes

Your hosts:

I hope you'll visit a few of these blogs too!

Rules of the link up: 
1. Please link to a specific post on your blog, not your blog’s home page.You may link up to 3 posts per blog.

 2. Please leave a comment for your host, remember it's a party!

3. Please be sure to visit a couple of other blogs and leave comments.

 4. No Etsy stores, giveaways or other link parties allowed.

5. Please link with a text link or party button to your host.

6. By submitting a link, you’re giving us permission and granting us the right to feature your project and photos on this blog, website and on social media. We will always give proper credit and a link back to your post.

 7. Each week, a few of our favorites will be featured on our blogs. Features will also be pinned to our Christmas Link Up Pinterest Board for even more exposure! If you were featured, be sure to grab a button!

I can't wait to see what  you link up!!


Last Minute Thanksgiving Decor: Placecard Free Printable

Share It:


Thanksgiving is practically here and if you want something to jazz up your holiday table I have just the thing. I made these cute little placecards that you can simply print, cut, and place! I used regular printer paper but card stock would work the best.  Click the link below to download and print.


You will need to cut each out so there is a side for the name and then a plain white side. You can see in the picture below how I cut. You will end up with 8 placecards per page.


Here are some more Thanksgiving ideas!  


Have a blessed and happy Thanksgiving!
Jenny