Days of Chalk and Chocolate - flowers Days of Chalk and Chocolate: flowers - All Post
Showing posts with label flowers. Show all posts

Quick & Easy DIY Wall Art

Share It:

Making your own DIY wall art is easy and a great way to decorate a room without spending big bucks on art.  We are sprucing  up the girls' bathroom on a very narrow budget so creating the wall art myself was a huge money saver! I adore the sweet flowers, and I am sharing my fabric flower tutorial with you today, too!
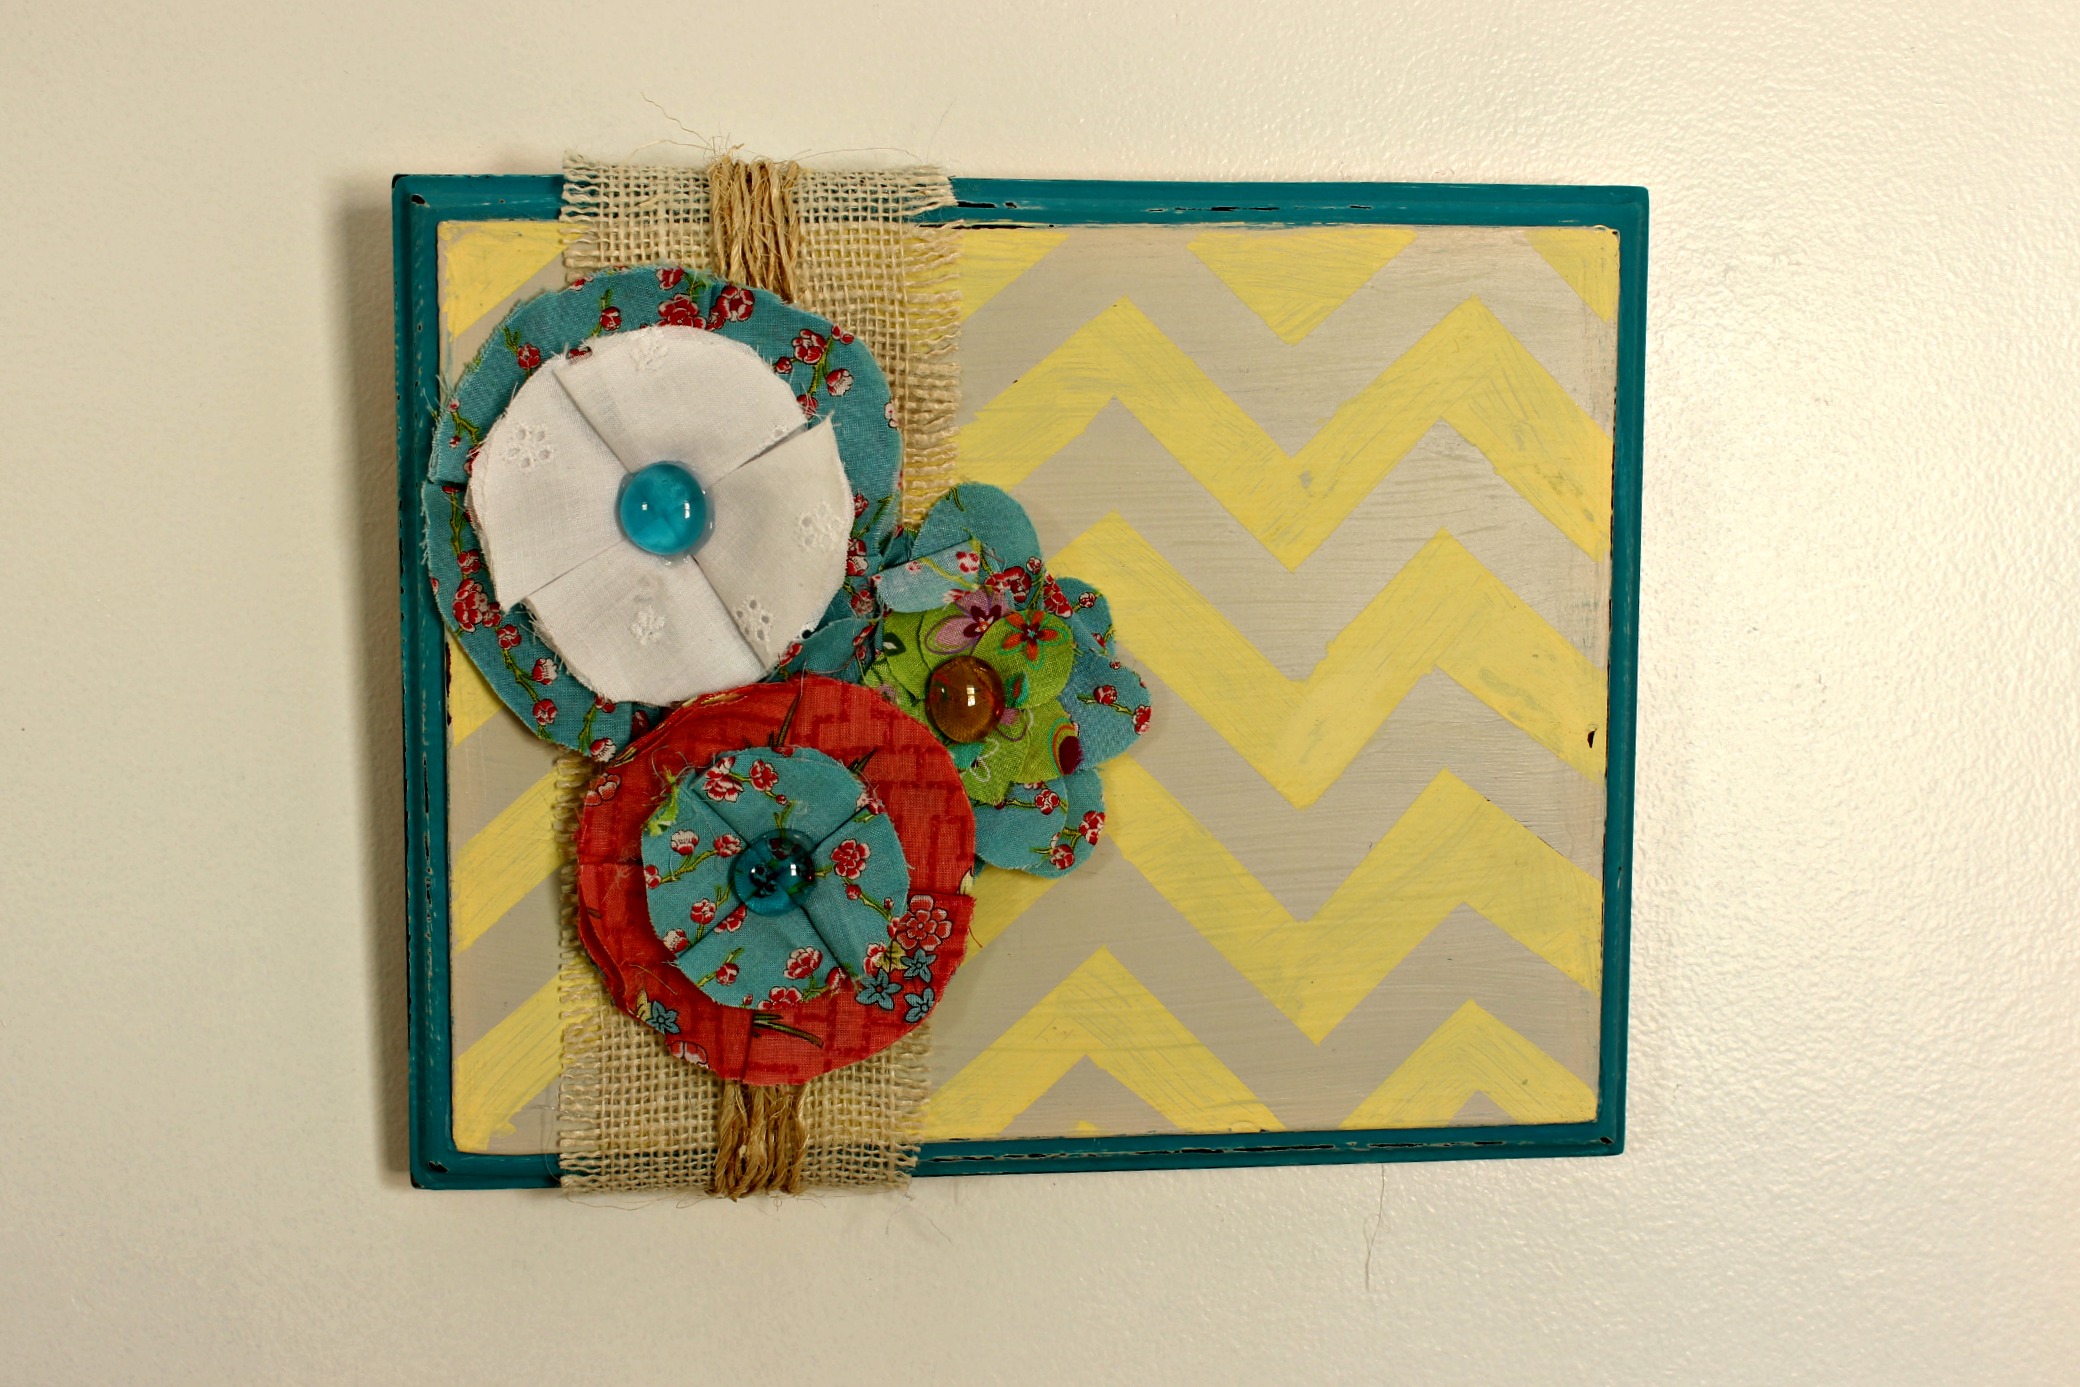
DIY wall art

I started with an old plaque I got at a garage sale. You can see how it looked before HERE. I had 4 of them and each was uglier than the next. I turned some of them into pictures of my girls but I had one left over.

The process to make this DIY wall art is easy. I coated the whole thing in pale gray paint, painted the edges teal with craft paint, taped off a chevron pattern, and painted over it with pale yellow craft paint. After it was completely dry, I used my glue gun to adhere a strip of burlap and some twine. Then I hot glued on these simple fabric flowers I had made eons ago but had never used. The end result is a sweet piece of wall art that brightens up the girls' bathroom! (By the way, you can check out more about sprucing up this bathroom HERE.)
 DIY wall art

There are other tutorials for making fabric flowers out there but here is my fabric flower tutorial and the way I made these.

Supplies: 2 different fabrics, felt, glue gun, embellishment (button, bead, etc.)
Cut 4 large circles and 4 smaller circles out of the fabric of your choice, and one rectangle out of felt.

diy art 014 
Starting with your large circles, fold a circle in half , add a dot of hot glue, and then carefully fold it in half again.

diy art 019
diy art 017 
Glue your folded circle onto your felt with the folded side toward the middle of the felt and the open parts toward the sides. Glue your next folded circle the same way. Make sure the folded sides are next to each other. Continue with the remaining two large circles.

diy art 022

diy art 023
Turn your felt  90 degrees and layer your smaller circles, folded in the same way, on top of the larger folded circles.

diy art 025 
Hot glue your embellishment in the center. I have used sparkly beads, buttons, and small rosettes. This time I used those glass beads you can buy at the dollar store.  You can also keep adding layers of smaller sized circles to your fabric flower to make it fluffy and fuller.
Trim your felt edges so they don't show from the front.

diy art 026

And there are so many ways you can use these such as on headbands, decorating a tote bag, pins, really so many things!

art5

Or use them to adorn some easy DIY wall art!  Hope you enjoyed my little fabric flower tutorial, too! Thanks for visiting!

Jenny
You can find me at 

Deck Mini Makeover Shopping List

Share It:
Molly is making her first communion in May and I thought would be the perfect time to refresh our deck a bit!  It is just one big flat boring deck but with a few touches I think it will clean up nicely!


Touches of Spring Decor

Share It:
diy easter spring decorations centerpiece

Spring is being coy and playing hard to get.  You know how it is....the less attention you get the more you want and spring is onto that. But what spring didn't count on is that we can find spring in other ways, not just in 65 degree days with sunny skies!  To beat the winter blues I ushered in the spring blues in the form of eggs, flowers, and ribbons!


How I Keep My Box Tops Organized

Share It:
Hi!  I was away for the last week or so, kickin my heels up at the beach in NC. It was awesome and I'm sure I'm going to bore you all with pics of my kids doing everything everyone else's kids do at the beach but we still think is super special anyway!  Hope y'all are doing fine!

So I have a few things I'm loving right now and pink carnations are one of them. I saw these in the market and knew they had to come home with me. They are so frilly and feminine, they almost look like they are wearing ruffled hats!


Planting a Deer Resistant Garden

Share It:

I adore our neighborhood! It is quite common to see families of deer walking through our yard or resting under our pine tree. But with the good comes the bad and I have quickly learned that deer will destroy my best gardening efforts.


Teacher Appreciation: Jazzing Up A Ho-Hum Plant

Share It:
Let's cut to the chase, shall we?
"You're a pretty good teacher. Thanks.So tell me again the purpose of writing a spelling word 5x?"
"Holy mackerel!  You are seriously the most creative and effectivel teacher ever. Thank you so much for all you do for our sweet children. We can't thank you enough. You really deserve a day at the spa or an African violet."


Shabby Chic Pillows (Simple Sewing)

Share It:
I made pillows!  I needed to do some simple sewing projects so I whipped up some shabby chic, cottage style pillows with envelope closures. It was like therapy. Why did I need therapy?


Christmas/Winter Wreath

Share It:
I wanted to have a wreath that would be appropriate for Christmas but would also take me through most of winter, including Valentine's Day. I think I did it!  What do you think?


Rosette Pumpkin Barrette

Share It:
I am crafty lately!  Look at what I made!  Some cute (and free!) rolled flower pumpkin barrettes!


I love browsing through Gymboree and looking at all their pretty seasonal hair accessories. I always think I'm going to splurge on something for Molly and Ellie but then I always reconsider. They refuse to keep cute things in their hair. Frankly, the only thing that they will consistently keep in their hair is maple syrup.

So instead of wasting money I decided to waste my time instead and whipped up some cute pumpkin barrettes made from the good old rolled flower rosette! I used scrap fabric and ribbon which is a bonus.

Here we go!  I know we've all seen the rosette tutorial before but here it is again for those that may have been living in an underground bunker for the past few years. Oh and for bunker friends, later we'll talk about tissue paper poofs.

I didn't want a lot of frayed edges so I hot glued a seam. I simply glued one raw side down and then the other.


Tie a knot on one end and begin rolling and twisting. Twist and roll and twist and roll. Spread a bunch of hot glue on a piece of felt and mash your rolled up rosette on top. Trim the edges of the felt off. In someone else's blog, the felt would be the same color as the flower. On this blog we're all lucky it isn't glued to an old pot holder.

Made a leave by accordion folding a scrap of green grosgrain ribbon. To keep the ribbon edges from fraying, lightly melt the edges with a match or candle. Anyway, hot glue the folds together on one end. Use a skewer to hold it together until it cools if need be. Glue onto the back of the pumpkin rosette.

Cut a small strip of brown grosgrain ribbon. Melt edges to prevent fraying and glue in place.
Glue the whole shebang onto an alligator clip. I did line my clip with some matching fabric so the glue wouldn't pull on their hair. Which was a waste of time because these barrettes have only touched hair for about 27 seconds.

And trying to take a picture of a toddler outside is about as easy as taking a picture of  Sasquatch and Elvis knitting a sweater.  So here are some cute pics of Ellie I jazzed up using Picmonkey. And trust me that the barrette is in her hair. Stuck to maple syrup no doubt.


I did not trim her bangs. Ok, I did. Like you couldn't tell. And like you've never done it. Riiiggggght.


Cheers!
Jenny

Spray Painted Plant Urns, Pumpkin Picking

Share It:
We are coming off of one of the best weekends we've had in a long time!  We were consumed with fall fun, friends, and food!  Fantastic!

First, remember the 13 dirty urns I found in someone's recycling?  I spray painted some black and then on a whim I spray painted some a pumpkin color. I wasn't sure if I'd like it but it turns out I love them. Something different!  And they bring a bit of color to our deck.


Before

After


On Saturday evening, some of our favorite friends came by for some fire pittin' and marshmallow roasting.  They have two girls around our girls' ages and they got to watch a movie in their jammies while we hung out outside after the marshmallows were done.  It was the perfect night and the best way I can think of to spend a crisp fall evening!


Today we went pumpkin picking with my sister's family. We are so fortunate to live in an area of NJ that is full of farms and quaint little places to celebrate the seasons. After a hayride and picking some pumpkins, we all enjoyed dinner in a local Italian restaurant. These are the times I hope my girls remember when they think of their cousins. We laugh a ton with my sister's family and I hope Ellie and Molly are able to have the same kind of relationship with their families when they grow up.

Ellie thought she was a lion and kept roaring. It may have been the cutest thing in the history of the world. Puppies everywhere cried with shame.


And lastly, I want to thank all of you that are following my little blog. I am enjoying sharing my life and hobbies here and it is very meaningful to know others are reading and enjoying it along with me. I love being a follower of your blogs too and appreciate being a part of such a great community!

Cheers!
Jenny

Fall Front Porches, Yard Sale Treasures

Share It:
Have you gotten your porch, stoop, or entryway ready for fall yet? I am trying to hold off buying mums, pumpkins, corn stalks, etc. for a few more days because I'm trying not to rush things. But I can't stop thinking about it! I'm sure you've seen most of these but I thought I'd share some of my favorite fall porches! Pin from the original source please!!

Ok, so I'm shamelessly self promoting my front porch from last year. Guess having a blog is shameless self promoting too.  So now I don't feel badly about showing off my little stoop display.
Days of Chalk and Chocolate


Blue Hydrangeas and Playing With PicMonkey

Share It:
Today was Molly's preschool graduation. It was adorable! They sang a mess of songs, got little diplomas, and then we had doughnuts and fruit in the fellowship hall. Perfect! I was proud of my little graduate (even if I think preschool grad ceremonies are a tad ridiculous). She is so excited for Kindergarten and I'm excited she'll have a full day of school! She is super ready.

Anyway, we have two potted hydrangeas in our backyard right now. Jim picked them up for me at Costco because he knows I just can't live in a house that doesn't have a hydrangea or two or 4 or 12. They are gorgeous but the forced blooms are starting to fade. I love them even more now since they've deepened from a brilliant blue to a darker, moodier blue/green. I clipped a few of the faded flowers to dry and have them all year. I used to do this in our old house and it was so nice to see my garden all year long. All you do is cut, bind them together, and hang them upside for a spell. So pretty!


So I snapped a few pics to show you all but then I got into playing around on PicMonkey which is my new go-to photo editing site now that Picnic is gone. It has most of the same great features and is as user friendly as Picnic. I used a couple of different effects and such.  Want to see what I did?

 I think the second picture is the closest to the actual color in real life, by the way.  The differences though are subtle among all the pictures. But I like subtle.


This is the the Gritty effect which I faded and lightened.


I think this is using the Cross Process.


This is the paint texture added to the background. I erased it from the flowers so it would just be in the back.


This picture is using the Tranquil effect and photo corners. Cute.

 It was oodles of fun to try different things!  I'm addicted I think!

Hope you are all having a great weekend!  Mine started with a small cone of black raspberry ice cream with dark chocolate chips.

Cheers!
Jenny

Halloween Glam Wreath

Share It:
I love fall. Adore it, actually.  While we dated, Jim and I would spend our falls hiking and watching the foliage change color. I've been a little bummed that all of our fall decor is in  a POD in our driveway. It's like my mercury glass pumpkins and other lovelies are being held hostage by the POD people who don't want me to have a festive home.  I know I just have to be patient. So in the meantime I created a wreath for Halloween but I didn't want it be too literal. I wanted it to be a bit glam and a bit creepy. I settled on black and white because I love black and white. I used some leftover linen to make what I hoped would look like mummy wrappings and, surprise surprise, I hot glued an assortment of fabric flowers that I embellished with lots of sparkles and pearls. Guess that's the glam part.  It will look fierce when my door is painted black!  Oh and it was really hard to take pictures. If the white part wasn't too bright then the black flowers were too dark and vice versa. My camera isn't fancy so I did the best I could.


I'm pretty happy with it!  I'm really loving looking at everyone's fall and Halloween projects, too. It's such a fun time of year!


Cheers!
Jenny


Giveaway Winner!!!

Share It:
I am so excited to announce the winner of the fabric flowers giveaway is...DANA from Pieces of Me!  She was number 15 (selected via Random.org) with her comment,

"Dana said...
I am following you! (And I added you to my google reader so I don't miss a thing!) "


I emailed you, Dana!  I hope you are thinking about your three additional flowers!  Can't wait to send it all out to you! Thank you to everyone who entered!  It is fun to think someone is going to win something I made! 

We are almost done with the kitchen. I'm heading over there today to wash the walls. Fun..not. But it will be worth it all in the end!

Hope everyone is enjoying your Thursday. Remember, the weekend is right around the corner!

Cheers!
Jenny

Last Day for the Giveaway

Share It:
If you haven't entered you can find all the details here.  I will announce the winner tomorrow and we will talk via email about the additional flowers you want!  I'm so excited for someone to win my little bits of fabric love.  My readers rock and deserve a flower or two or fifteen!


and just for fun

Last October in the hats my sister knitted. My little pumpkin and my sweet apple!
Cheers!
Jenny

Fabric Flowers Giveaway!!

Share It:
After my fall wreath debuted on this site I received emails regarding the fabric flowers I used. So many of you asked me how I did them or wished you could do them as well. Of course you all can when you follow all the tutorials out in the blogiverse. But wouldn't it be easier if someone did it for you?  Well, I did because I'm just that kind of friend! HA!  I made 12 different fabric flowers to giveaway! And...the winner will get to choose 3 more of HER/HIS CHOICE for COLOR and STYLE!  Crazy you say?  Nope!  I told you..I'm the crazy flower lady.  These flowers are great for decorating wreaths, headbands, sweaters or you can glue a pin on the back and make them into brooches. Also included is a  white eyelet project bag that you can store your flowers in. 


So here are the details:

The winner (1) will receive a total of 15 fabric flowers--12 I have made and 3 you pick out based on style and color. We will discuss it via email.
The 12 premades include 3 blue, 2 lavender, 2 green,  2 green/purple, 3 gray
Styles include rolled, burned edge, and folded

The winner, chosen by Random.org,  will be announced on 9/22/2011.

Please remember that each flower is HANDMADE and therefore not perfect.  The pictures are the most accurate representation I can produce but colors/textures/imperfections may appear different in person.  I hope you all understand! But I really did try to make them as pretty as I possibly could.

I also ask that if you win that you don't sell them.  If you make something and post about it on your blog a little credit wouldn't hurt.  : )   Sorry but this giveaway is only open to the lower 48 states.

Entries:

1.  Leave a comment on this page (1 entry)
2. Mention this giveaway on your blog (1 entry)
3. Become a follower and leave a comment here telling me (1 entry)
Leave a comment here telling me (1 entry)

So that's a total of 4 entries per person! Please leave a separate comment for each entry. Thanks!


Good luck!  By the way, the green is so pretty in person. I loved it so much I made one for myself. And the gray felt ones are very fallish so  you could pin one on a scarf or a jacket and it would be adorable. Just sayin'!

Tomorrow we close!  YAY!  We will be out and about most of the day. I hope you all have a great Thursday!

Cheers!
Jenny

Basic Pillow Sewing Tutorial

Share It:
If you are a regular reader you know I'm a very novice sewer. My heart is there but my skill is not. That being said, I keep trying!  My mom was a sewer so growing up I watched her and gleaned this and that from watching her. I hope to use a lot of the blog tutorials to make my sewing more advanced and start doing more intricate projects. But until that happens THANK GOODNESS FOR PILLOWS!!  And I figure I can't be the only starter sewer out there so here is a tutorial for all of those who sew a button on and need 4 Band Aids afterward.

I made these pillows last week:


This is how I did it:


Step 1:  Choose your fabric. I chose cotton duck because my original pillows were brick red and I wanted to cover them. It wrinkles so easily that I don't know I'd use it again but it certainly is durable.


Step 2:  Measure your pillows and add an inch to all the sides for your seam allowance. Cut out two pieces. Lay them so their right sides are together. Pin if you need to. I did not.


Step 3:  Start sewing. I create a knot by running the needle on 0 a couple of times and then move forward. Love sewing in a straight line. Love. It.  To make neat and clean corners bring the foot of your machine up and  manually bring the needle down and turn your fabric.  Release the foot back down and continue sewing on your next side. Don't make a knot and start over.


Step 4: Continue sewing. Depending on the size of your pillow leave an unsewn opening so you can insert your pillow. Obviously, you're thinking, right?  Yeah, obvious. I have almost always  never stitched it up.


Step 5: I like to trim my seam allowance a bit at this point and I also make a small slit in the corners so they don't bunch when you turn it right side out which is the next step.

Step 6: Turn right side out. Use a long, not sharp, object to help you get the corners out perfectly. I use a long knitting needle because it works perfectly.


Step 7: Insert pillow and seal up the opening. Now here is where real sewers should look away and sew a prom gown or something. I don't sew my openings up. They never look good to me because it should be done by hand and it looks different from the rest of the stitching. I use Liquid Stitch which is essentially a really strong fabric glue.  Run a small bead of glue along the seam you need to close and clip it closed with clothes pins, paper clips, magnets shaped like fish...whatever!   Leave overnight.


Step 8:  Rest your weary, all-sewn-out head on the pillow you just created!


For these specific pillows I glued the ribbon trim on before I sewed the pillow. I used hot glue (technical, I know) and extended it past my seam allowance so it would be neatly sewn in between the seams.


The flowers are just hot glued on too.

I will have more pillows to show you soon!  I really have to learn to slipcover this sofa so I can stop making pillows.  It's not leaving me much time to make flowers. HA HA HA!


Enjoy your long weekend!

Cheers!
Jenny